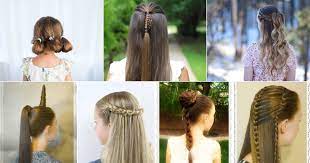
15 Adorable and Fun Elastic Band Hairdo for Young ladies
The Low Pig tail and the elastic band
To make a low braid haircut:
Begin with spotless, dry hair. Whenever wanted, utilize a brush to eliminate any knot and guarantee that your hair is smooth.
Put your hair at the focal point of your neck and accumulate it with a clasp. Ensure the braid is tight enough not to get out but rather not really close that it’s awkward. Utilize a brush to streamline any knocks or knots in your hair. Whenever wanted, you can utilize a light-hold hairspray to assist with keeping your hair set up.
The High Braid
To do a high braid, follow these means:
Brush your hair completely.
Assemble all your hair into one hand and lift it towards the highest point of your head. Utilize a bind to get the hair set up, guaranteeing it’s sufficiently tight to hold all of your hair yet not so close that it harms. On the off chance that you have fine or flyaway hair, utilize a fastener with a little clear flexible or a hair net to keep your hair set up.
The Side Braid
- To do a side braid, follow these means:
- Brush your hair to eliminate any knot.
- Part your hair aside utilizing a brush or your fingers.
- Accumulate all your hair as an afterthought with the part and bind it with a hair flexible.
- You can fold a strand of hair over the hair versatile if you have any desire to cover it.
- To add volume, tenderly pull along the edges and top of the pig tail.
- Use fasteners or clasps to get the hair set up, if essential.
The Air pocket Pig tail
To do an air pocket pig tail, follow these means:
Brush your hair to eliminate any knot or bunches.
Secure a low pig tail with a versatile band.
Part the pig tail into two equivalent areas.
Take one region and fold it over the versatile band to make a circle.
Secure the circle with another versatile band.
Do again with different groups to make it done.
Rehash the circling system, switching back and forth between the two regions until you arrive at the ideal number of air pockets.
Partake in your air pocket braid!
The Crown Twist Braid
Here is a bit by bit guide on the most proficient method to make a crown twist braid:
Brush your hair to eliminate any bunches.
Make a part of in the middle between, from your temple to the scruff of your neck.
Take a little choice of hair from the front of your head on one side close to your sanctuary.
Mesh this part of hair and secure it with a versatile band. Rehash this step on the opposite side.
Take a segment of hair from the highest point of your head and plait it, protecting it with a versatile band.
Rehash stage 5 until all the hair is meshed from the highest point of your head.
Take the two plaits from the sides of your head and bring them rearward of your head.
Get one interlace over the other, and fold it under the contrary twist.
Secure the two meshes along with bobby pins.
Assemble all the excess hair into a braid, and secure it with a versatile band.
Conceal the flexible band by folding a strand of hair over it and protecting it with a bobby pin.
Change the plaits to your ideal look, and you’re finished!
The Plaited Pig tail
Here is a straightforward technique to make an interlaced braid hairdo:
Assemble your hair into a low pig tail at the scruff of your neck and secure it with a clasp.
Partition the pig tail into three equivalent segments.
Mesh each part independently, beginning at the roots and plaiting down to the closures.
When every one of the three interlaces are finished, unite them and secure them with another pin.
To add volume, tenderly pull on the interlaces at the crown of your head.
Wrap up by showering with a light-hold hairspray to keep the twists set up.
Likewise Read: How to Eliminate Counterfeit Tan to Level Out Your Skin In a flash
The Fishtail Braid
To make a fishtail braid:
Assemble your hair into a high or low pig tail, protecting it with a versatile.Partition the pig tail into two equivalent segments.
Take a slight strand from an external perspective of the left segment, move it over to within the right region, and add it to the right group.
Rehash on the right segment, taking a slim strand from an external perspective and moving it over to within the left region.
Rehash stages 3-4 until you arrive at the finish of the pig tail.
Secure the end with another versatile.
To get done, tenderly pull on the sides of the plait to release and cushion it for a more loosened up look.
The Sock Bun
This is the way to make a sock bun pig tail:
Secure your hair with an elastic band at the pinnacle.
Pick a sock and cut it off from the toe segment.
Fold the sock into a donut shape and secure the slice edge to the lower part of the hose with heated glue or texture stick.
Place the sock donut around the foundation of the pig tail, ensuring the braid is in the focal point of the donut.
Spread your hair equally over the sock, getting the finishes into the hose.
Smooth down the hair and change the bun on a case by case basis.
Whenever wanted, secure the bun with bobby pins or clasps.
You can utilize hair shower or other styling items for added hold.
The Top Bunch
Here is a bit by bit manual for making a top bunch braid:
Accumulate all of your hair at the crown of your head and secure it into a high braid with a fastener.
Brush through the pig tail to eliminate any bunches or tangles.
Curve the braid firmly around itself until it begins to loop into a bun shape.
When the bun is framed, fold the closures of the pig tail over the base and secure it with bobby pins.
Pull tenderly along the edges of the bun to make it look full and round.
Discretionary: Embellish with a hair extra like a scarf or barrette for added interest.
The Muddled Bun
This is the way to do a muddled bun haircut:
Brush your hair to eliminate any knot and to guarantee that your hair is smooth.
Assemble your hair into a high pig tail. You can make it as close or free as you like, contingent upon to what lengths volume you will go for in your muddled bun.
Bend the braid until it turns into a rope-like shape.
Fold the contorted hair over the foundation of the pig tail to frame a bun.
Secure the bun with bobby pins, tucking the closures of your hair under the bun.
Pull a couple of strands of hair around the face and sides to relax the look and make a more chaotic impact.
Use hairspray or texturizing shower to hold the bun set up and add surface to your hair.
Part your hair down the middle or aside.
Take a segment of hair from the front of your head and separation it into three equivalent parts.
Begin meshing by getting the external segments over the center area.
As you mesh, add hair from the sides of your head to every external segment prior to getting it over the center area.
Continue plaiting and including hair until you arrive at the scruff of your neck.
Secure the finish of the interlace with a hairpin.
The Cornrows
Here are the moves toward make a cornrow haircut:
Wash and condition your hair to make it more straightforward to work with.
Part your hair into little areas, beginning from the front and working to the rear of your head.
Plait each part, beginning from the roots and interlacing towards the closures of the hair.
Utilize a reasonable flexible band or pin to get the finish of each mesh.
Rehash the twisting system for each segment of hair, and interlace the new region with the past one to make a persistent example.
Use hair oils, ointments, or sheen splashes to add sparkle and saturate your hair, whenever wanted.
Style your hair as wanted. You can go for various interlaced examples or add extras like globules, scarves, or barrettes.